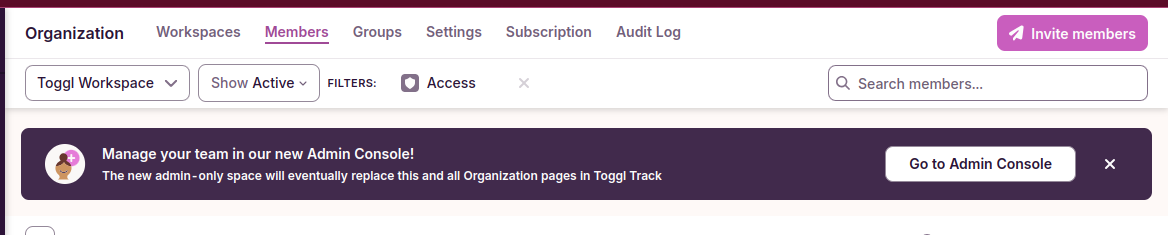
The newly launched Admin Console is being rolled out to all workspaces in phases. When the Admin Console is available in your account, you will see its banner on the Members page in Toggl Track.
What is the Admin Console?
The Admin Console is the new and powerful section to manage your Organization settings, workspaces, and members from across Toggl Tools. The Admin Console currently supports Toggl Track, Toggl Work, and Toggl Focus.
Where is the Admin Console?
The Admin Console is only available for Organization Owners and Organization Admins.
You will be able to access it by clicking on the "Go to Admin Console" button in the banner on the Track Workspace Members page or by clicking "Admin Console" at the bottom of the sidebar.
The Admin Console allows you to:
-
Activate or remove Toggl tools (Toggl Track, Toggl Work, or Toggl Focus) from workspaces
-
View multiple workspaces under one Organization (available for Enterprise pricing only) and manage Members, and Workspace Settings.
-
Manage Organization settings like its Name and Ownership.
-
Leave the Organization
-
Coming Soon: Manage Subscriptions
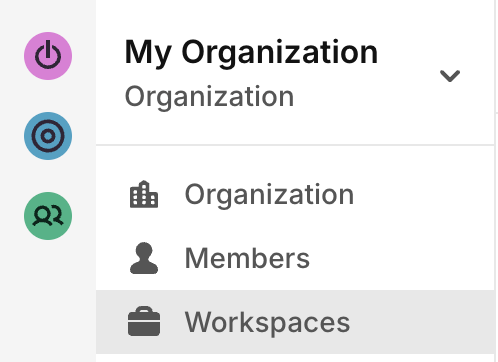
Managing an Organization
Clicking on the Organization button in the side navigation bar opens the Organization page, where you can view and change the name of the Organization, manage Organization ownership, enable 2FA enforcement, and delete your organization.
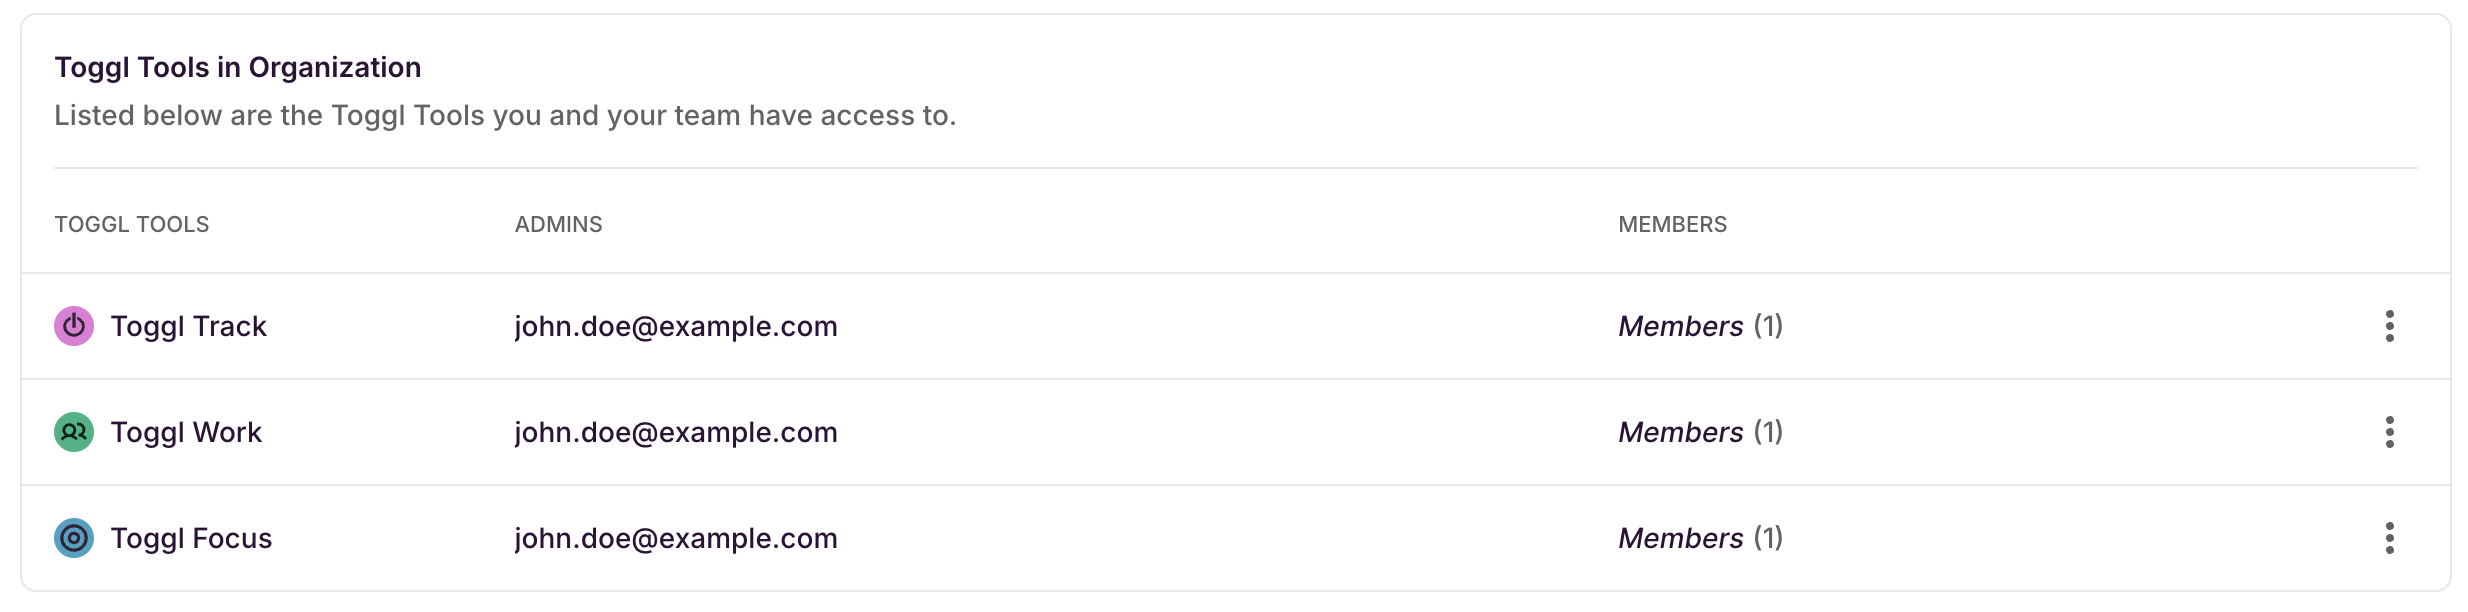
For Organizations who only have one workspace, this is also the page where you can manage the Toggl tools within your Organization.
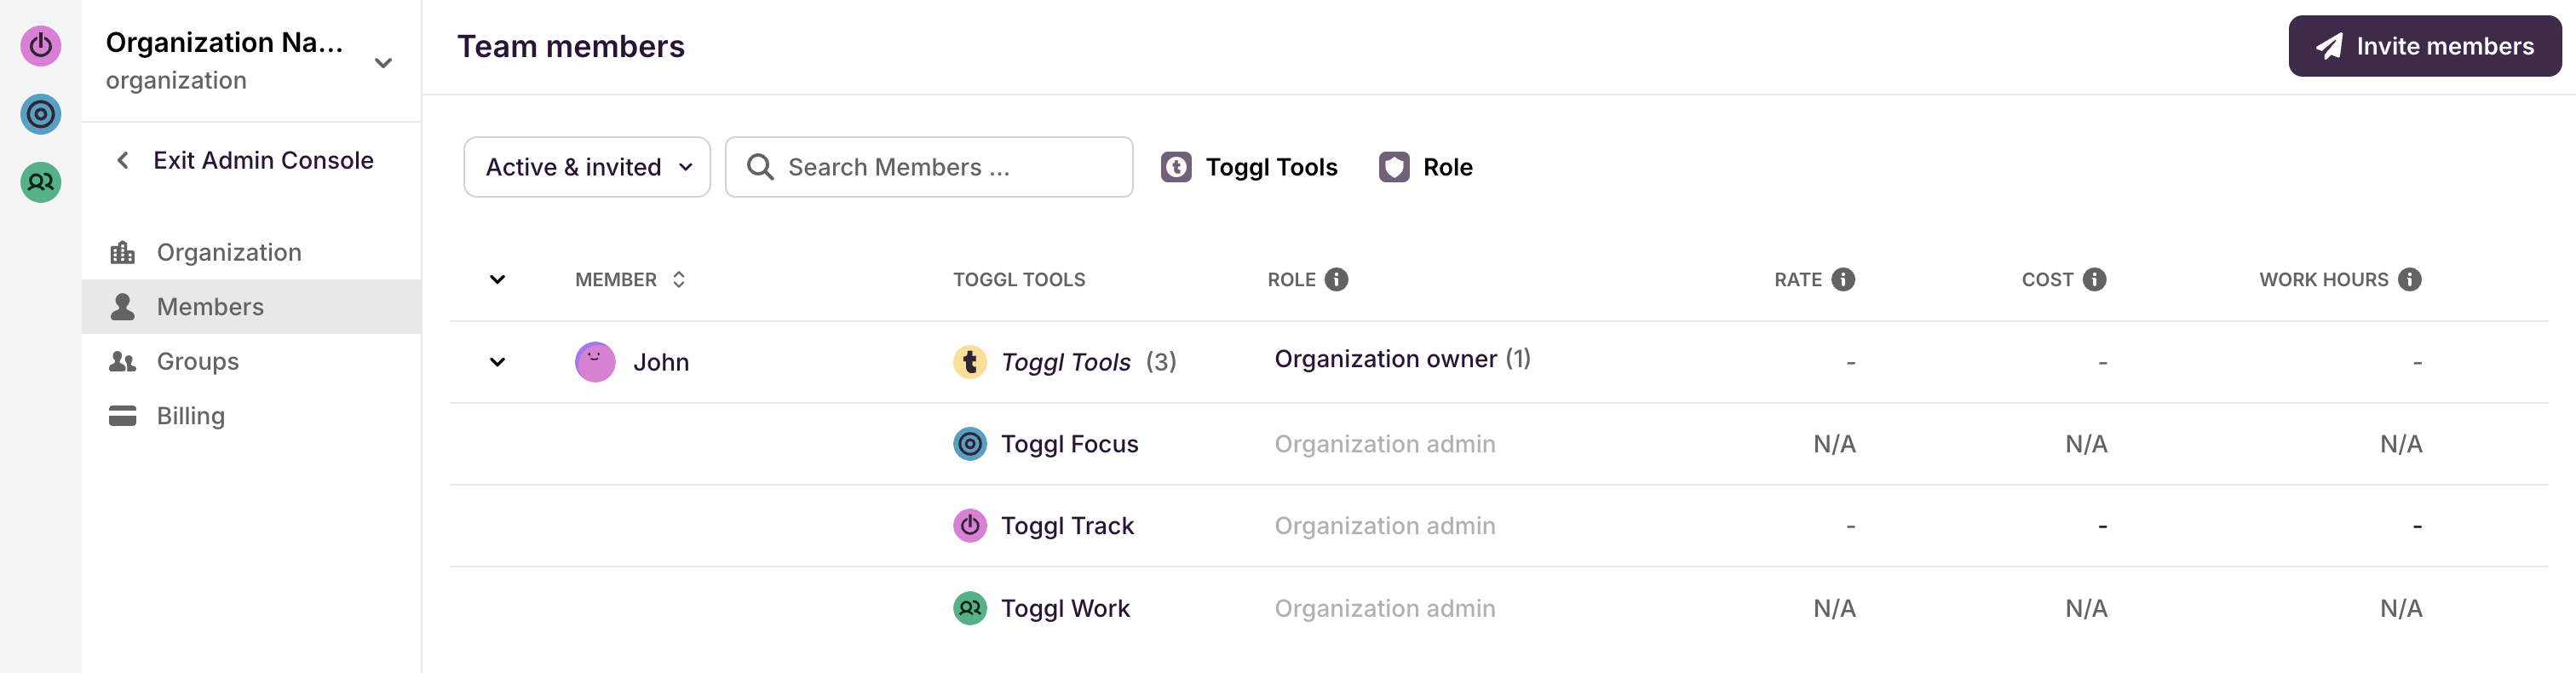
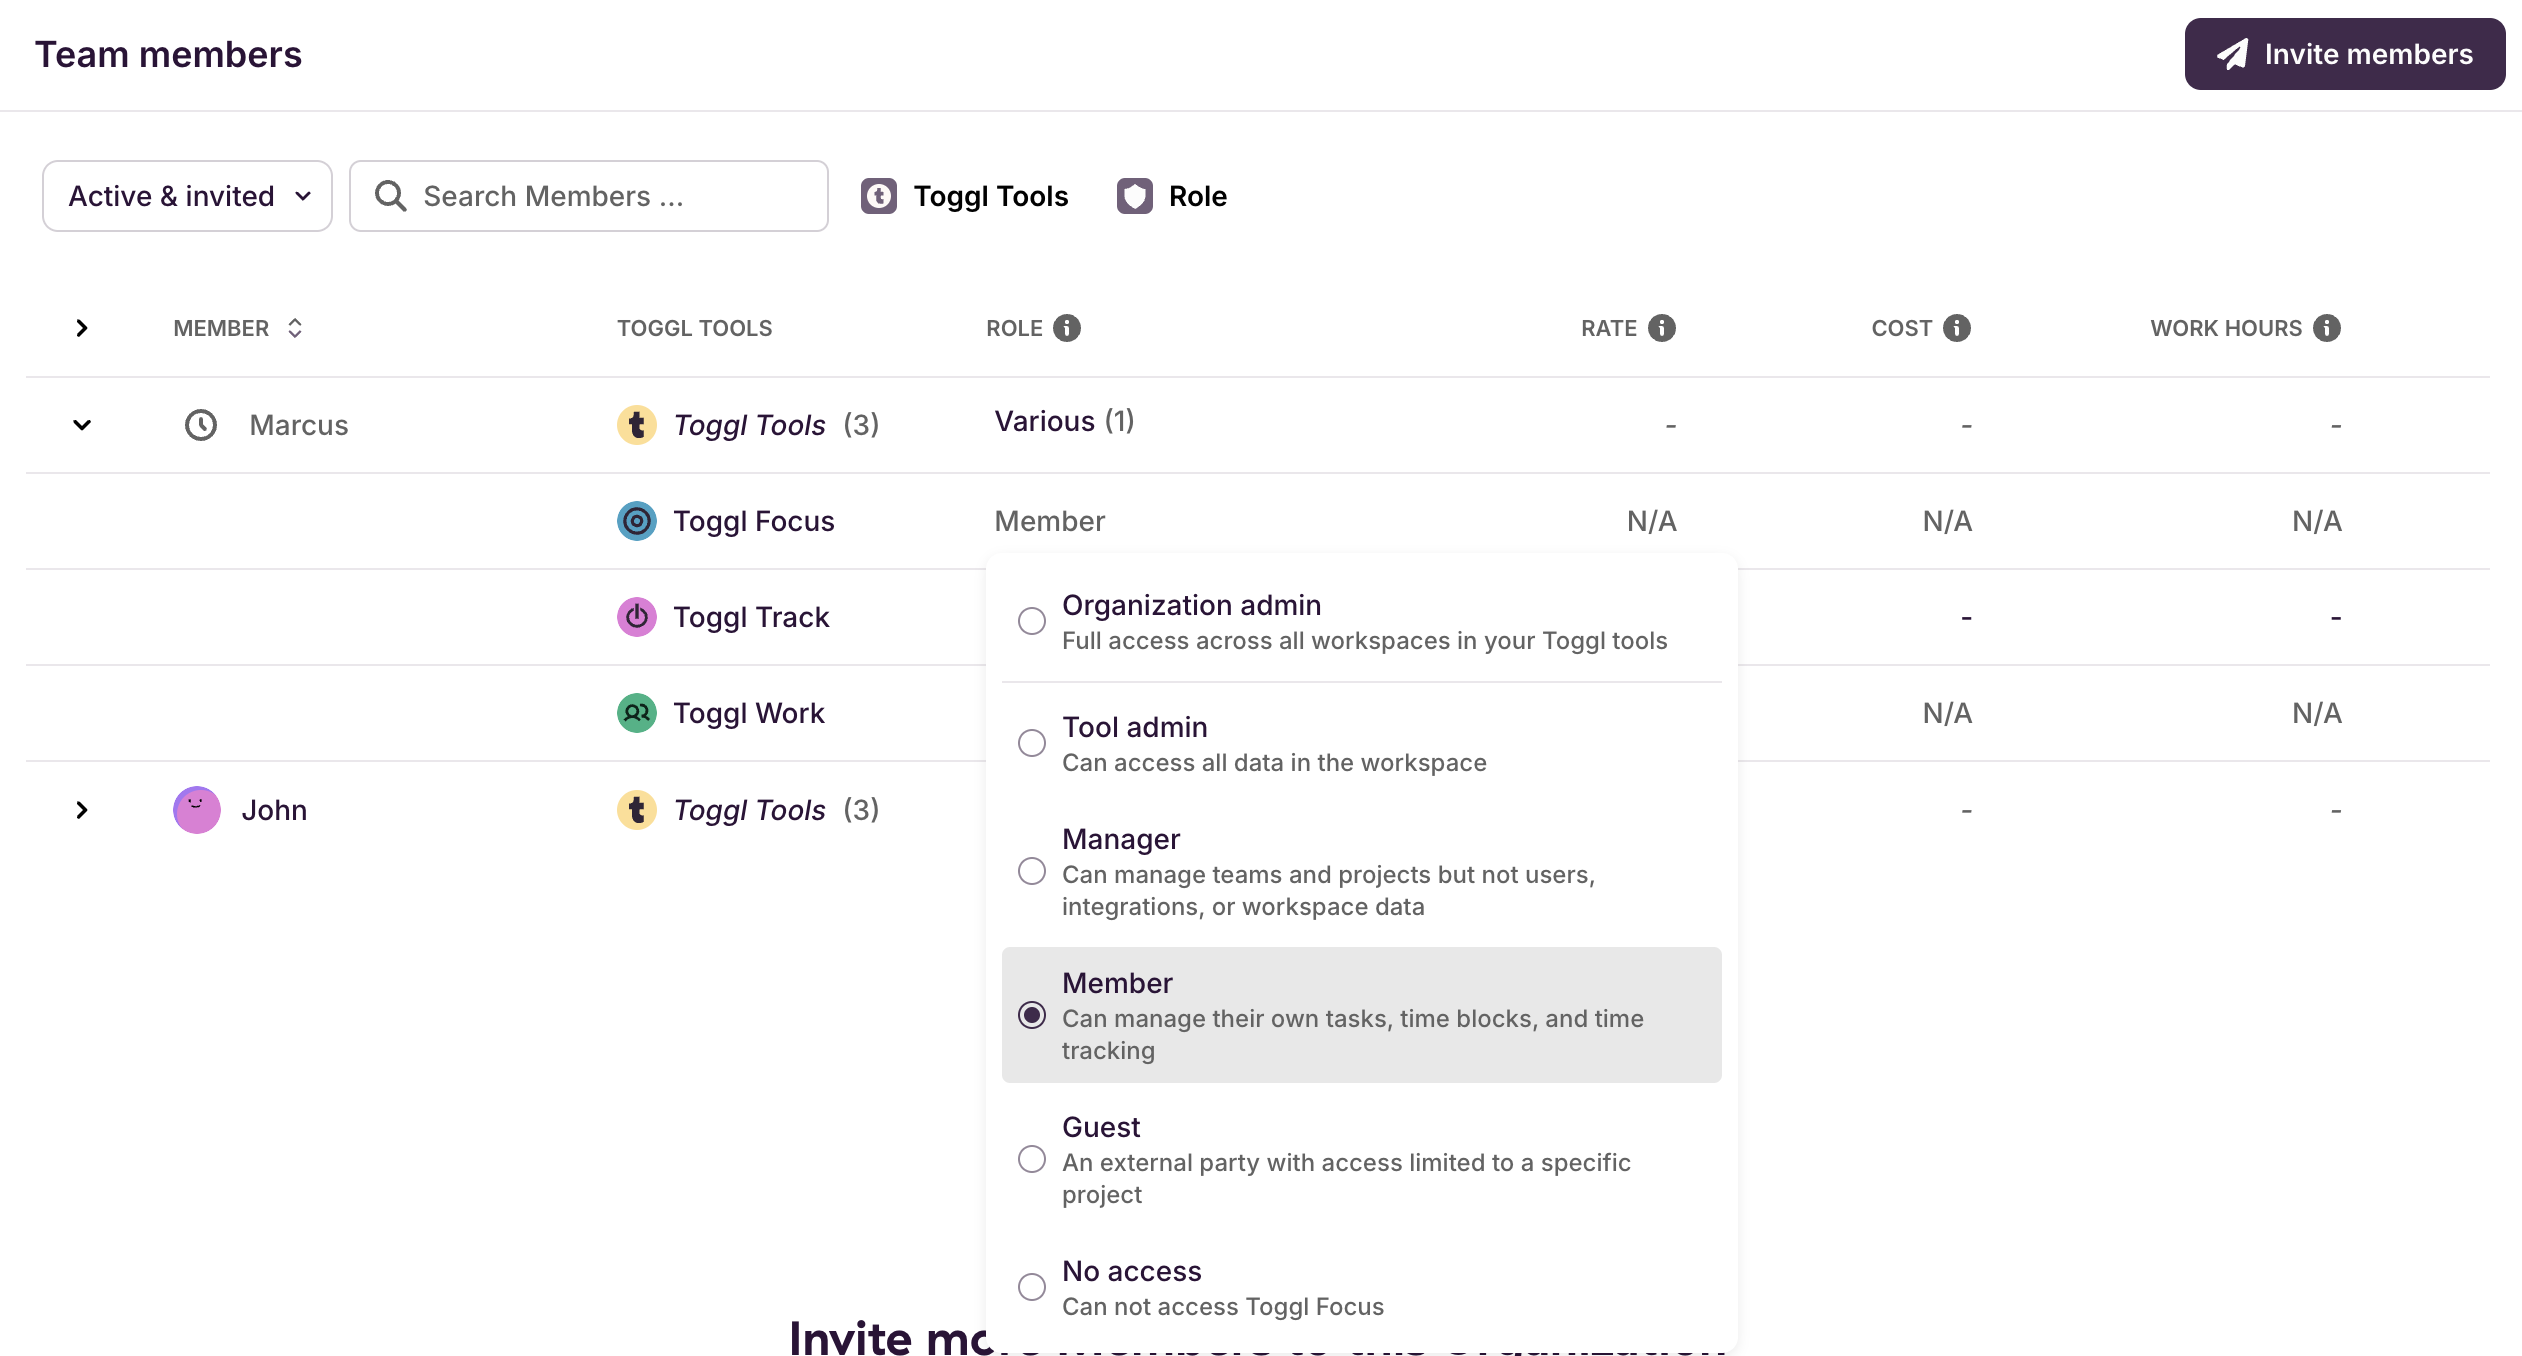
Managing Organization Members
The Organization Members tab shows all users in the chosen Organization, and their Access-level for each Toggl tool at the Workspace level.
This is also where you will be able to Invite new members to your Organization.
Filtering the list of members on the Organization Members view:
The Filters bar allows you to:
-
Filter based on their status
-
Filter based on a Toggl tool they are part of
-
Filter based on their role / access level
-
Filter based on Workspaces they belong to (Enterprise pricing only)
-
Search for users using their name or email.
Editing Organization members
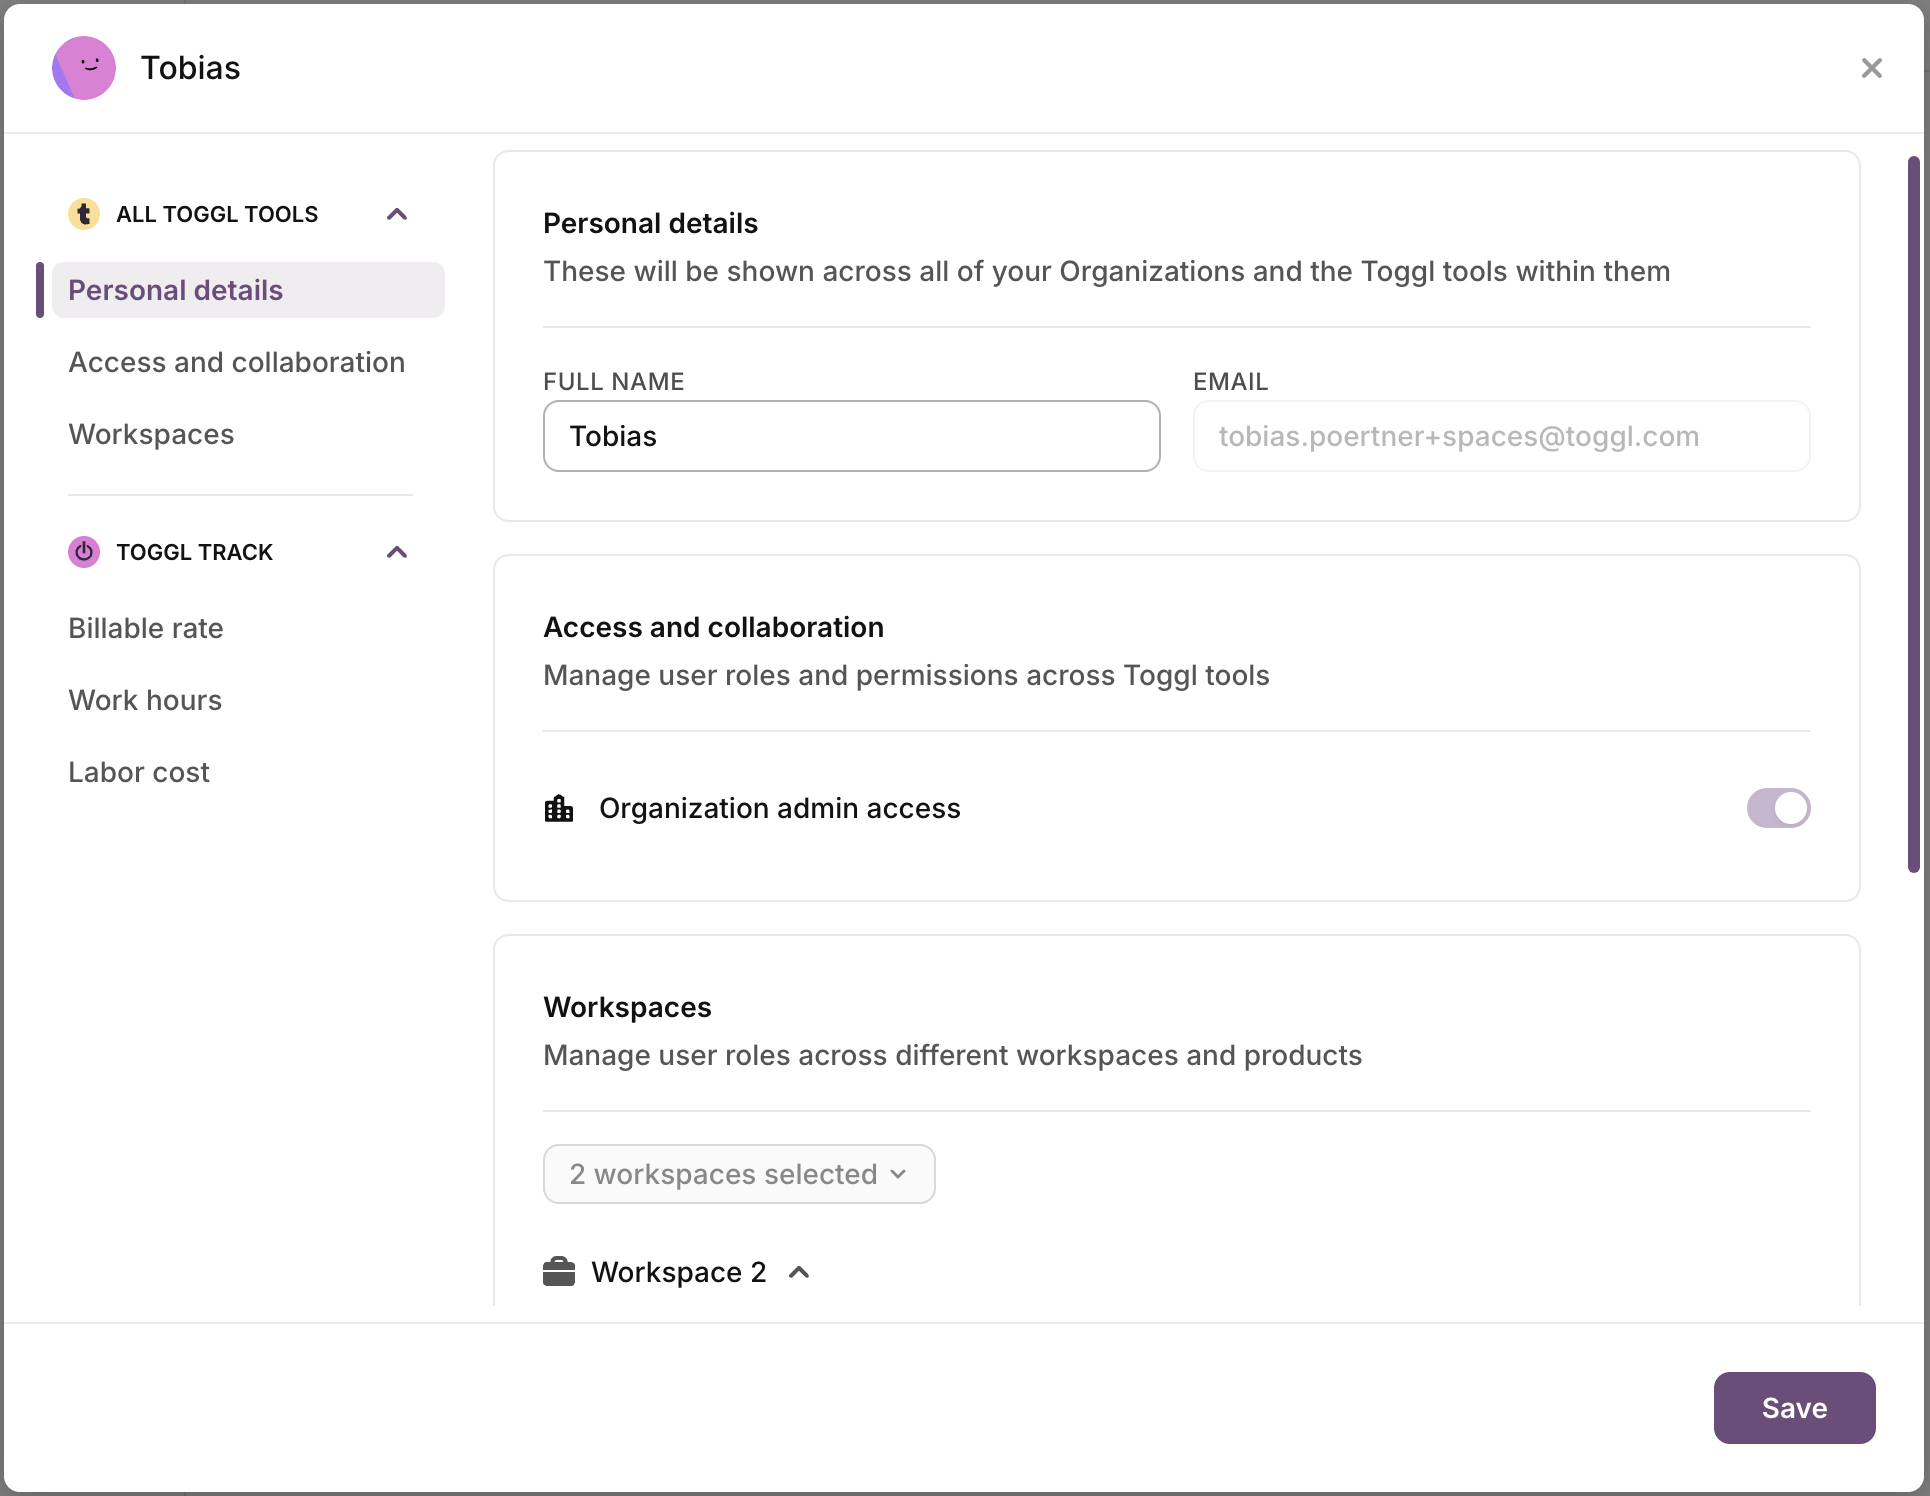
You can use the 3-dot control to Edit, Deactivate and Remove users from an Organization. The Edit button allows for additional options to manage the access right of users on both the Workspace and the Organization level.
This is the Edit member details window, where you can grant the different access levels. You can also open it by clicking on the member name in the members table.
Granting the Organization Admin level on a user will automatically add the user to all Workspaces under said organization with Organization admin privileges.
Bulk Edit Organization Members
To edit multiple members at once, click the checkbox at the start of each row for all the members you want to edit. Then select the property you want to change for the selected users from the action bar that shows up above the members table.
You can currently perform the following bulk edits:
- Add or remove members from workspaces
- Add or remove members from teams
- Add or remove tags
- Set work hours (requires Premium plan)
- Set labor cost (requires Premium plan)
- Set billable rate (requires Starter plan)
- Delete or deactivate members

Tips
- Clicking the checkbox in the table header will select all members on the current page.
- You can use filters in conjunction with bulk editing to perform changes for all members that match certain criteria – for example, members with a certain tag or role.
- To deactivate multiple members at once, press the delete action. You'll be presented with a dialog to choose whether you want to deactivate or delete the selected members.
Inviting new Organization members
To invite a new member to your Organization:
-
Click the "Invite Members" button on the Members page in the Admin Console
-
Enter the email addresses of the new members you wish to invite

-
Once you are returned to the Member page, set the role for each new member within each Toggl tool by clicking on "Workspace member"


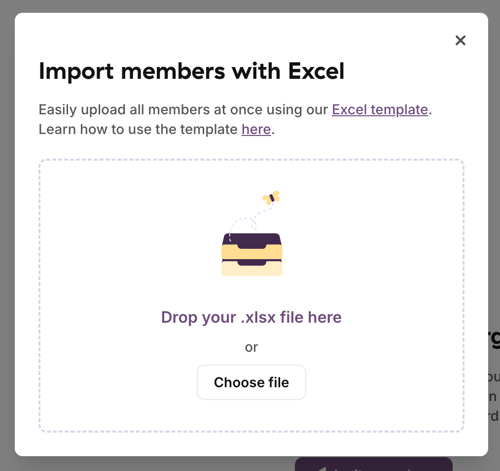
Bulk Import Members from an Excel-File
You can bulk import users via a .xlsx file and directly assign their name, email, and role (per workspace and per product).
-
Download the Excel template from Google Sheets by clicking on "File > Download > Microsoft Excel". You can insert your member data before or after this step.
-
Click on "Import" next to the "Invite members" button in the top right corner of the members page.
-
Upload the template with the members you want to invite to your Toggl organization.
-
You will get a preview of the identified members and if there are any errors with your data.


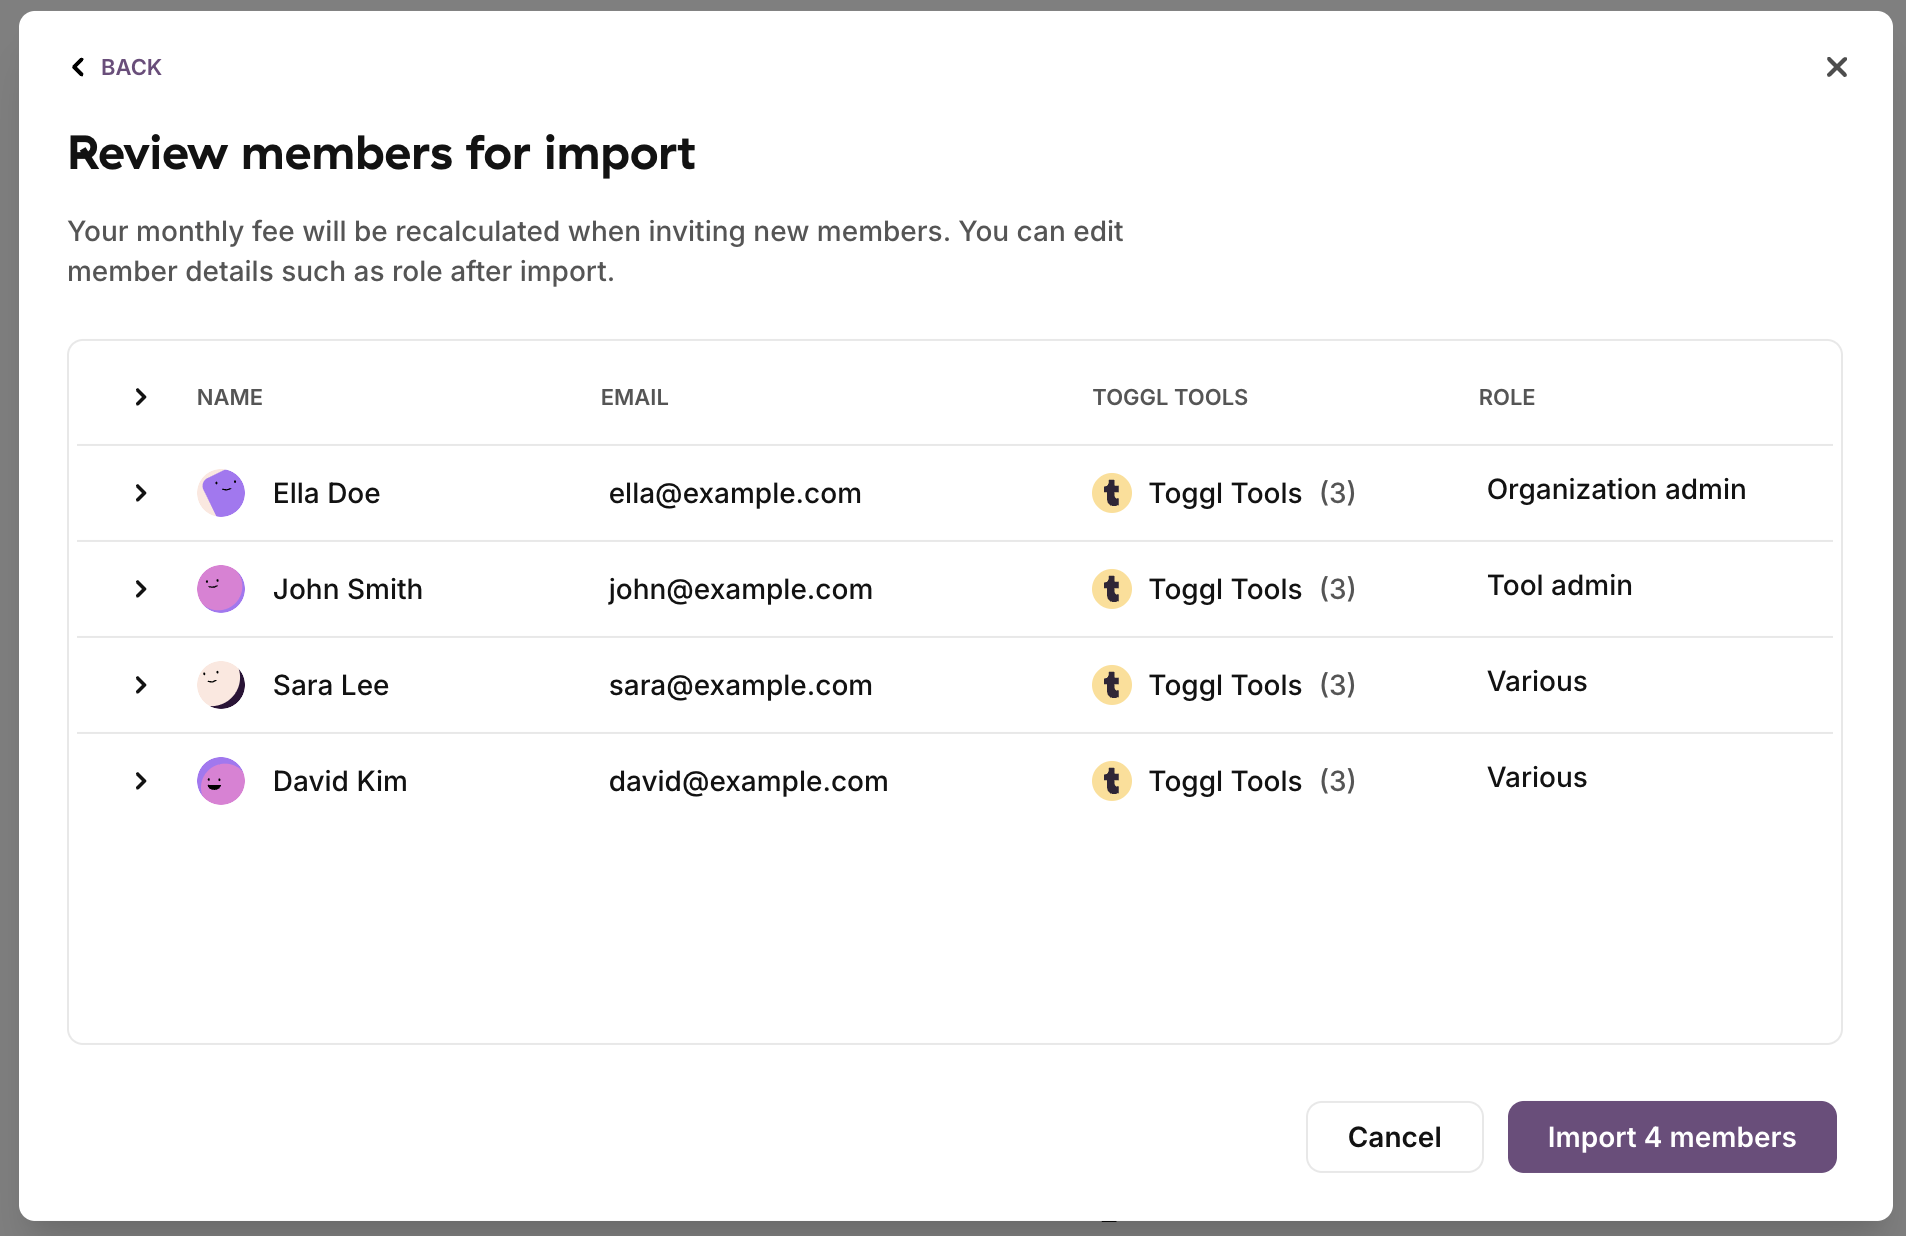
Click on "Import X Members" to start the invitation process.
Notes:
-
Members that are already part of your organization will be skipped
-
Members with errors will be skipped during the import process
Tip:
Keep the file with all your members and add new members as your team grows. We will automatically identify existing members and only invite new members to your Toggl organization.
Managing Toggl Tools in a Workspace
Trial and Paid Organisations have the added flexibility of adding or removing individual Toggl Tools from their Organisation or Workspaces.
For Organizations who only have one workspace, this can be done by:
-
Visit the Admin Console
-
Clicking on the Organization page in the side bar
-
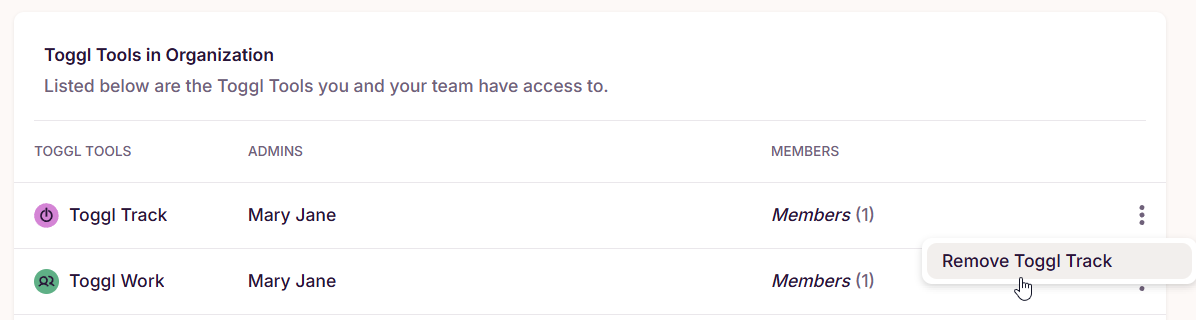
Scroll down to the "Toggl Tools in Organization" section
-
Click the 3-dot menu beside the Toggl Tool you wish to add or remove
-
Click Add or Remove from the sub-menu that appears
For Organisations with Multiple Workspaces, the above functionality will be available in the Workspaces section under the Admin Console.
NOTE: As of today, only Toggl Track, Toggl Work, and Toggl Focus can be managed from the Admin Console. We're working to expand this management functionality, so stay tuned!
Managing Multiple Workspaces
For Organizations who have multiple workspaces (available for Enterprise pricing only), the separate Workspaces page will allow you to:
-
Create new workspaces
-
Rename existing workspaces
-
Add or remove members from workspaces
-
Change user roles within each Toggl tool, in each workspace
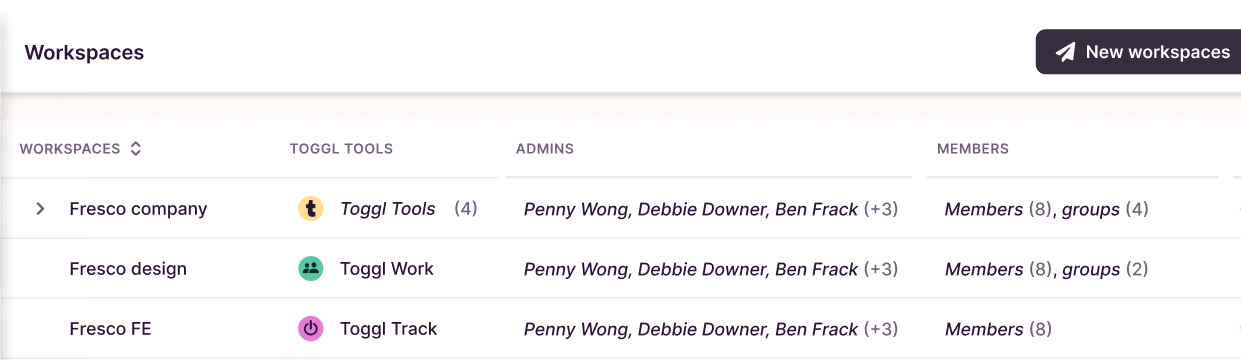
To access the page, click on Workspaces on the left navigation bar in the Admin Console:
Note: Users on our enterprise pricing (contact Sales) will be able to add multiple workspaces under one Organization.
Managing teams
You can see the different capabilities of team roles here:
|
|
Toggl Track |
Toggl Work |
|
Team Lead |
- see & edit time entries of team members |
- approve time-off requests of team members |
|
Team Member |
- track time entries for team lead to edit |
- submit time-off requests for team lead to approve |
|
No Role |
- implicit access to Toggl Track workspaces of the team |
- |
Editing teams
You can edit teams by clicking on their name or by clicking the 3-dot menu that appears when hovering over a team on the right side of the row.
Edit team member roles by clicking on the arrow on the left side of a row to expand it. You can then simply click in the row field for the member you would like to update the role for. Roles are applied across all enabled tools in the workspaces the team is assigned to.
Notes:
-
adding a member to a team in a workspace with Toggl Track enabled will give them implicit access to Toggl Track as if they would be a workspace member
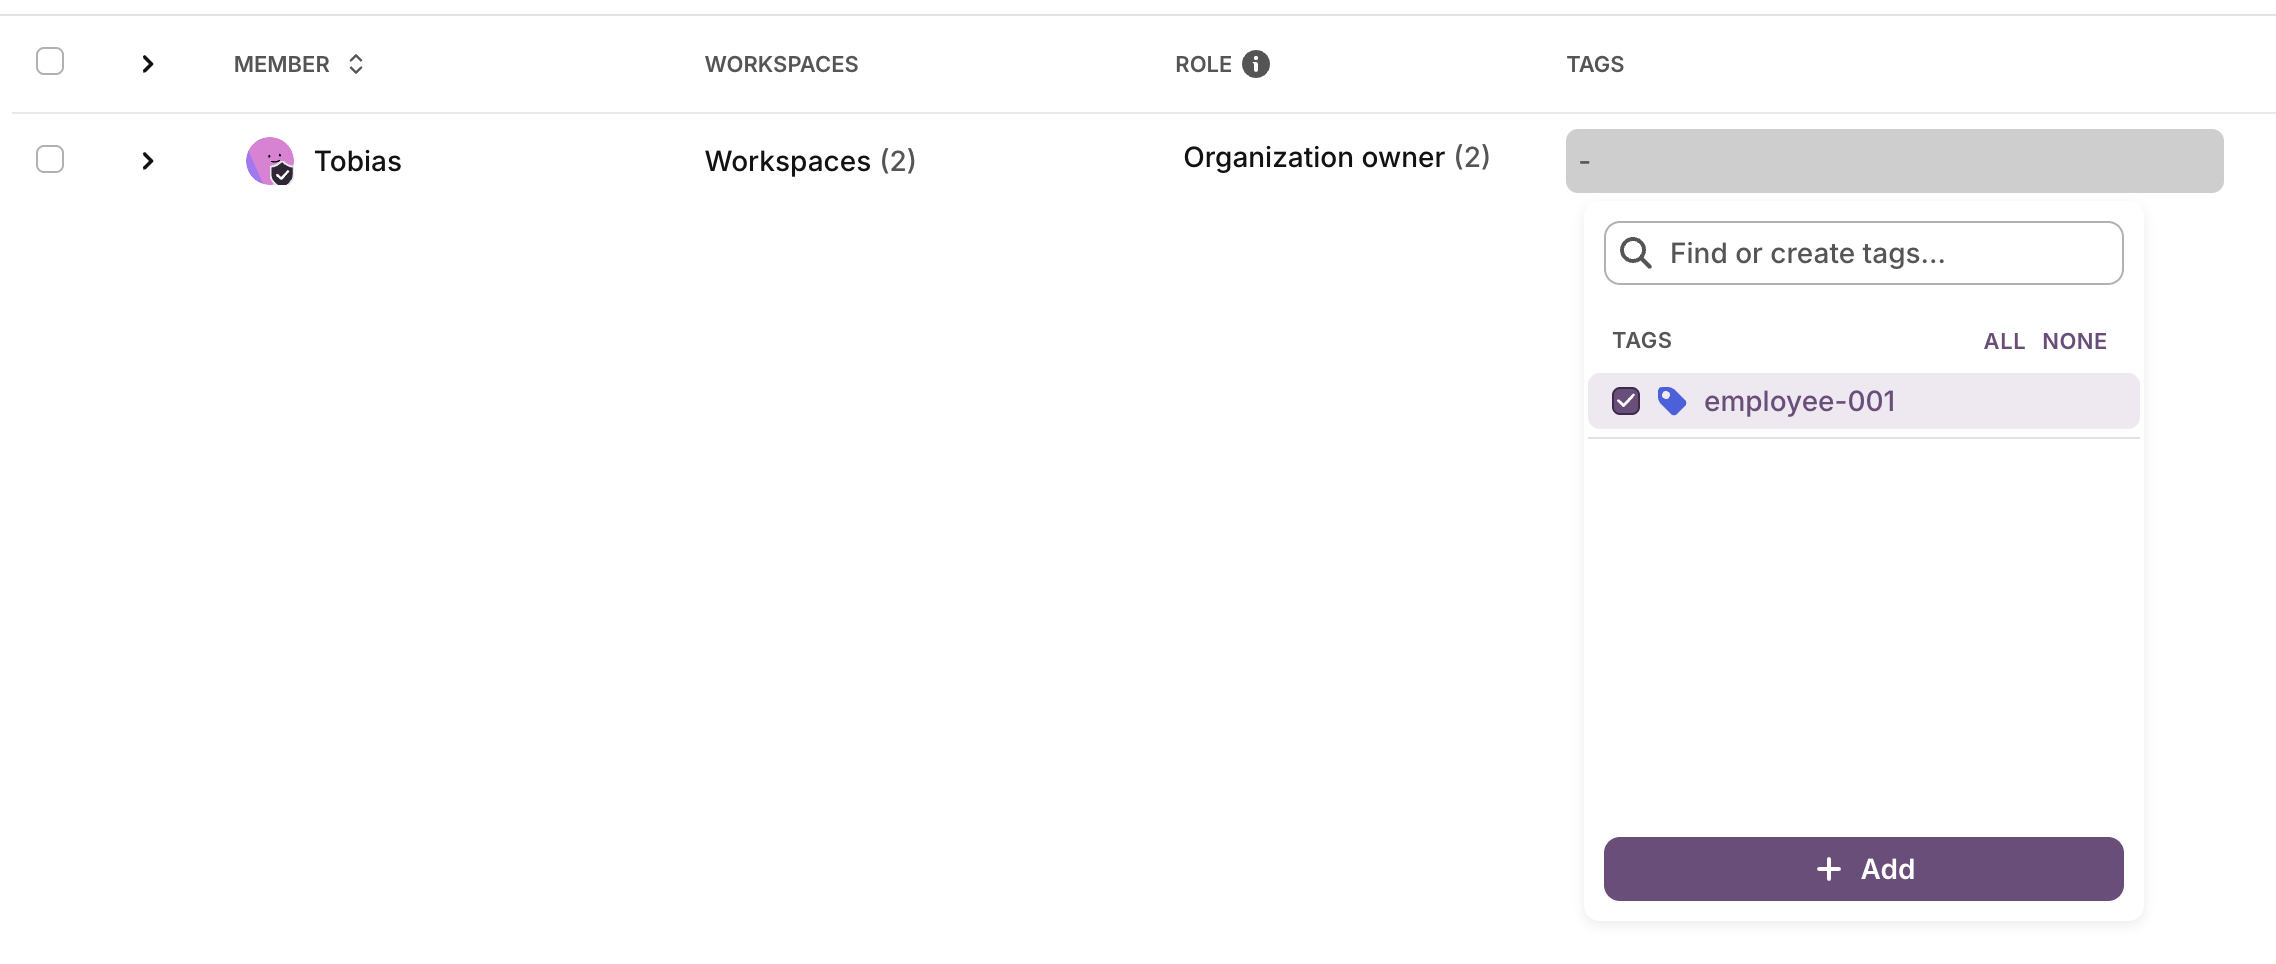
User tags
User tags can be added to store additional information at user-level eg. their employee id, their department.
Creating user tags
-
Navigate to the members page in the admin console and click in the tags field for the user you want to assign a tag to.
-
Type the name of the tag in the search field and press enter or confirm by clicking on "Add". The tag will automatically be assigned to that user.
Editing user tags
-
Click into any tags field on the members page in the admin console to open the user tags list.
-
Click on the pen icon on the right side that appears when you hover over a user tag. Here you can change the name, color, or delete the tag.
Notes:
-
User tags are not yet available in reports (but we're working on it)