Adding Time Entries in Timesheet View
Conveniently created your weekly timesheets in one view. This guide covers how this view works.
Our Timesheet View provides a clear, organized way to review and manage your logged time, making it simple to track hours and stay on top of your schedule. Featuring a classic, intuitive interface, it streamlines time logging for a hassle-free experience. Whether you're managing projects, or reviewing hours, the Timesheet View ensures a seamless and efficient process, helping you stay productive and organized without the unnecessary complexity found in other tools.
To see your Time entries in Timesheet View, simply click the Timesheet option on the right of the Timer page.

Unlike the Calendar or List view, the Timesheet view sorts and summarises all your weekly time entries by row in a simpler manner.
Weekly Work hours
This is a Paid feature as it requires access to Billable Rates.

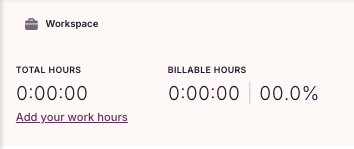
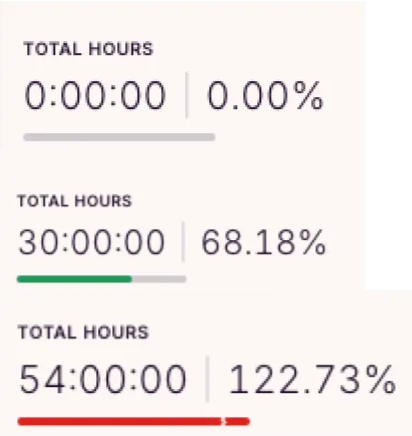
Add your weekly work hours to easily monitor your progress throughout the week. This feature allows you to compare your logged time against your target hours. Simply click on Add your work hours and enter your work hours to get started.

Should you be on the free plan, you will still be able to see your total hours worked but you won’t have access to the visual comparison of your comparative work hours for the week.

Add & Create Projects
To add or create a Project, click on + Add row

Select the Project that you would like associated with the current row. If the previously created projects don’t suit your needs, simply create a new project by selecting + Create a new project.

Add Time
After selecting a Project, click on the desired cell you would like to Add time to. The cell will display 0:00:00 (Hours: Minutes: Seconds). Once ready, simply press enter OR click outside the cell and the information will be automatically saved.

Reduce / Update Time
Should you make a mistake while entering you Time, all you need to do is change the time spent in the appropriate cell and press enter / click outside the cell. Your changes will be automatically saved.
Billable Rate & Tags
If you hover your mouse over the left of the timesheet cells, you will see the options of adding a Tag or to make the row Billable.
If there are different combinations of Tags or Billable Rates attached to a Project, a new row will be created for the associated Project to ensure all your information is captured accurately and displayed in an easy to understand manner.

Should the Time Entries be modified to have the same Tags and Billable rate used, they will automatically be combined to avoid duplicate entries or confusion.
Copying Last Week’s Entries
To help speed up your timesheet entry input, you can copy data from your previous week using the Copy function. When clicked, you will observe a dropdown with two (2) options:
1. Display Last Week’s Projects
This option will temporarily display the projects you tracked time against from the previous week. You can then choose to enter new time for these projects.
Note: Projects will only remain visible if you fill in at least one (1) cell in that row. If no time is entered and the page is refreshed, the projects will disappear.

2. Copy All Entries & Projects from Last Week
This option will permanently copy both the projects and their corresponding time entries from the previous week into the current one. You can make adjustments to the copied entries as needed.

Percentage-Based Time Entry
This feature is not available on the Toggl Free Plan, it requires a Starter or Premium subscription to access it.
The Timesheet view supports percentage-based time entry. Simply enter a percentage value (e.g. "50%") and the system will automatically calculate the duration based on your total weekly work hours.

How It Works
-
Set Your Weekly Hours (if not already configured):
-
Ensure your admin has entered your weekly work hours (e.g. 44 hours/week)
-
-
Enter a Percentage:
-
Click any timesheet cell
-
Type a percentage value (e.g. "25%", "50%", "100%")
-
Press Enter or click away
-
-
Automatic Calculation:
-
The system converts your percentage entered into each cell into hours based on your weekly total.
-
Example: 50% with a 44 hour week is 22 hours
-
To properly use the percentage-based time allocation, your weekly hours must be configured by your admin.
Time Entries in different views
Time entries created via the Timesheet view will have a default Time Entry Description - “System Added Time Entry” to indicate that this has been created by the Timesheet view. Should you wish to rename this, you are able to by modifying the Time Entry Description.

Time Entries as seen in the Calendar View

Time Entries as seen in the List View
Entering Time into timesheets - Supported Formats
With the new Timesheet View, you can input time in hours and minutes using different formats. Simply enter a value in a cell, and the system will automatically convert it into the correct time format.

Accepted Input Formats
|
Input Example |
Output |
|
5 |
5 hours |
|
5.5 |
5 hours and 30 minutes |
|
5:30 |
5 hours and 30 minutes |
|
5h30m |
5 hours and 30 minutes |
|
120m |
2 hours (converted from minutes) |
|
30m |
30 minutes |
How It Works
-
Numbers without units (e.g. 5) are treated as hours.
-
Decimal numbers (e.g. 5.5) convert the decimal part to minutes (.5 = 30 minutes).
-
Colon separated values (e.g. 5:30) are read as hours:minutes.
-
"m" suffix (e.g. 30m or 120m) treats the value as minutes (automatically converts to hours if ≥ 60).
Useful Information on Time Entry Behaviour
Creation
-
If there are no entries for a specific project
-
A new entry will be created at 8 AM
-
If an entry is longer than 16 hours, it will start at the beginning of the day
-
-
If there are existing entries for the project
-
In order of priority that a Time Entry will be created:
-
(Priority 1) The system will try to find a project with the Time Entry Description - System Added Time Entry which does not overlap with other entries
-
(Priority 2) The system will try to find entries with Time Entry Description - System Added Time Entry
-
(Priority 3) The system will try to find entries with no overlapping Time Entries
-
-
The above rules will be attempted by extending stop time or start time
-
Crossing midnight of next date or previous date is NOT allowed, a New Time Entry will be created in such cases
-
-
When a new Time Entry is created, the system will look for free slots between Time Entries otherwise it will follow the Work hours (starting from 8am)
Deletion/Reduction of Duration through Timesheet View
When a user attempts to reduce the time through the timesheet view, the system will use the following priorities when considering which Time Entry to modify.
-
(Priority 1) Time Entry Description = System Added Time Entry
-
(Priority 2) If the Time Entry is overlapping with a different Time Entry
-
(Priority 3) The Time Entry with a Longer duration
Bulk Delete Entries
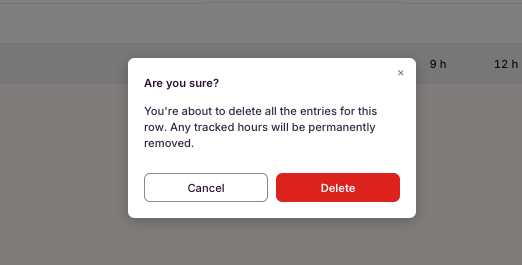
Should you wish to delete all Time entries associated with a particular Project, on the far right of each row. you can find an ‘x’ button which allows you to delete all time entries created that are associated with the row.

Upon clicking it, a confirmation will pop up. By pressing Delete here, all the associated time entries will be deleted.

Shortcut Keys
To make timesheet navigation more efficient, you can use the Tab key to move quickly across your week within the same project. Simply click on the cell where you’d like to enter time, input your hours, and press Tab to advance to the next cell.
Note: This shortcut applies within a single project row. To enter time for a different project, click on the corresponding row and repeat the process.