Zapier Integration
The Toggl Track Zapier integration allows you to automate your time tracking workflows by connecting Toggl Track with 6,000+ apps. Whether you want to automatically start time entries from new tasks, sync projects across platforms, or generate reports, this integration makes it possible without writing any code.
Popular Use Cases
Project Management
- Automatically create Toggl projects when new projects are added in Asana, Trello, or Monday.com
- Sync project updates bidirectionally between Toggl and your PM tool
- Add team members to projects automatically when they join in your HR system
Time Tracking Automation
- Start time entries automatically when tasks are assigned to you
- Stop running timers when you mark tasks as complete
- Create time entries from calendar events
Reporting & Analytics
- Send daily/weekly time reports to Slack or email
- Create invoices automatically based on time entries
- Update spreadsheets with time tracking data
Team Management
- Invite new team members to workspaces automatically
- Update user roles when permissions change in your HR system
- Notify managers when team members log time on specific projects
Getting Started
1. Connect Your Account
- In Zapier, search for "Toggl Track"
- Click "Sign in" or "Connect a new account"
- Enter your Toggl Track API Token
- Find your API token at the bottom of your Toggl Track profile page
- Click "Yes, Continue" to authorize the connection
2. Build Your First Zap
Once connected, you can use Toggl Track as either:
- Trigger - Starts your Zap when something happens in Toggl (e.g., new project created)
- Action - Does something in Toggl when your Zap runs (e.g., create time entry)
Triggers
Triggers start your Zap automatically when something happens in Toggl Track.
Available Triggers
Real-Time Triggers (Webhook-based)
- New Activity (Any Type) - Fires instantly when any supported event occurs (projects, clients, time entries, tasks, tags, workspace users, etc.)
Polling Triggers (Check periodically)
- New Client - When a new client is created
- New Project - When a new project is created
- New Tag - When a new tag is created
- New Task - When a new task is created
- New Time Entry - When a new time entry is added (with filters for workspace, project, task, and tags)
- New Time Entry Started - When a time entry is started
- New Workspace - When a new workspace is created
Actions
Actions let you create, update, or search for data in Toggl Track.
1. Create Client
Creates a new client in your workspace.
Required Fields:
- Workspace
- Client Name
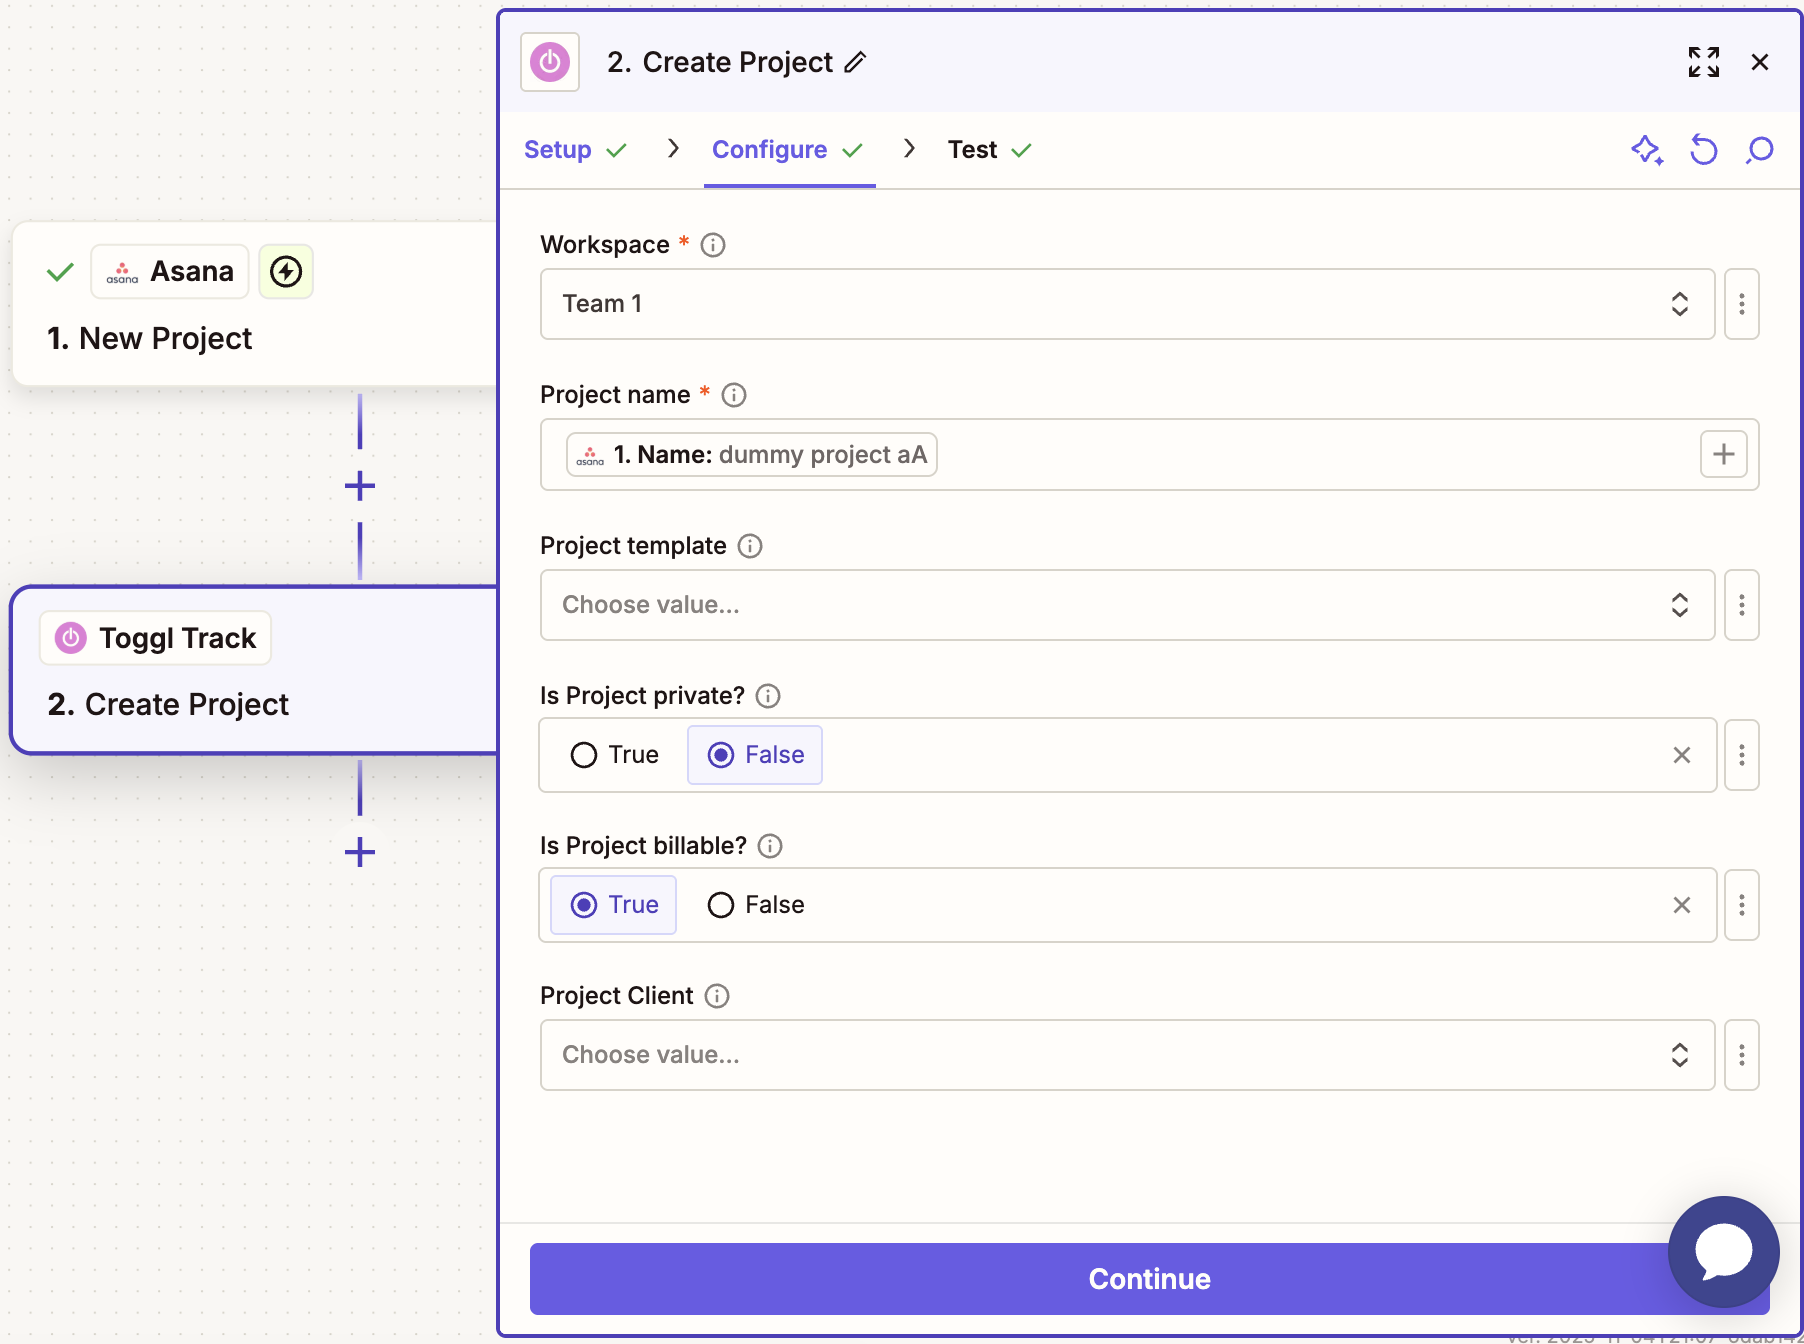
2. Create Project
Creates a new project in your workspace.
Required Fields:
- Workspace
- Project Name
Optional Fields:
- Client
- Is Private (true/false)
- Is Billable (true/false)
- Template (select from existing project templates)
3. Create Tag
Creates a new tag in your workspace.
Required Fields:
- Workspace
- Tag Name
4. Create Task
Creates a new task in a project.
Required Fields:
- Workspace
- Project
- Task Name
Optional Fields:
- Status (active/inactive)
5. Create Time Entry
Creates a completed time entry.
Required Fields:
- Workspace
- Start Time
- Duration (in seconds)
Optional Fields:
- Description
- Project
- Task
- Tags
- Billable (true/false)
- User ID
6. Start Time Entry
Starts a new running time entry (like clicking the "Start" button).
Required Fields:
- Workspace
- Start Time
Optional Fields:
- Description
- Project
- Task
- Tags
- Billable (true/false)
7. Stop Time Entry
Stops a currently running time entry.
Required Fields:
- Workspace
- Time Entry ID
Update Actions
1. Update Project
Updates an existing project's details.
Required Fields:
- Workspace
- Project ID
Optional Fields:
- Name
- Active status
- Billable status
- Client ID
- Is Private
- External Reference
- Template ID
2. Update Project Member
Updates a project member's settings (rate, labor cost, manager status).
Required Fields:
- Workspace
- Project User ID
Optional Fields:
- Rate
- Labor Cost
- Manager (true/false)
3. Update Workspace User
Updates a workspace user's settings.
Required Fields:
- Workspace
- User ID
Optional Fields:
- Active status
- Billable Rate
- Labor Cost
- Role
Team Management Actions
1. Create Invitation
Invites users to your organization and workspace.
Required Fields:
- Organization
- Email addresses (comma-separated)
- Workspace
Optional Fields:
- Skip Email (send invitation links without emails)
2. Create Group
Creates a user group in your organization.
Required Fields:
- Organization
- Group Name
Optional Fields:
- Users (array of user IDs)
- Workspaces (array of workspace IDs)
3. Add User to Project
Assigns a user to a project.
Required Fields:
- Workspace
- Project
- User
Optional Fields:
- Rate
- Labor Cost
- Manager status
Search Actions
1. Find Client
Searches for a client by name.
Fields:
- Workspace
- Client Name
- Status (active/archived/both)
2. Find Project
Searches for a project by name.
Fields:
- Workspace
- Project Name
3. Find Tag
Searches for a tag by name.
Fields:
- Workspace
- Tag Name
4. Find Task
Searches for a task by name.
Fields:
- Workspace
- Task Name
- Status (active/inactive/both)
5. Find Time Entry
Searches for time entries by description and date range.
Fields:
- Workspace
- Description
- After Date
- Before Date
6. Find User
Searches for a workspace user by email.
Fields:
- Organization
- Workspace
- User Email
7. Find Time Entries (Multiple)
Returns multiple time entries for a date range with filters.
Fields:
- Workspace
- Start Date
- End Date
- Project (optional)
- Client (optional)
- Description (optional)
- Billable status (optional)
8. Generate Detailed Report
Generates a detailed time tracking report.
Fields:
- Workspace
- Start Date
- End Date
- Project (optional)
- Client (optional)
- Billable status (optional)
- Grouping options
Dynamic Dropdowns
Many fields use dynamic dropdowns that load data from your Toggl account:
- Workspaces - Automatically populated with your workspaces
- Projects - Filtered by selected workspace
- Tasks - Filtered by selected project
- Tags - Filtered by selected workspace
- Clients - Filtered by selected workspace
- Users - Filtered by selected workspace/organization
- Templates - Project templates in your workspace
This makes setup easier and prevents errors from manual entry.
Example Workflow
Workflow 1: Project Management Integration
Goal: Automatically create Toggl projects when new projects are added in your PM tool.
Zap Setup:
- Trigger: Asana - New Project
- Action: Toggl Track - Create Project
- Workspace: Your workspace
- Name: [Asana Project Name]
- Is Billable: Yes
Result: Every new Asana project automatically becomes a Toggl project with the correct client.
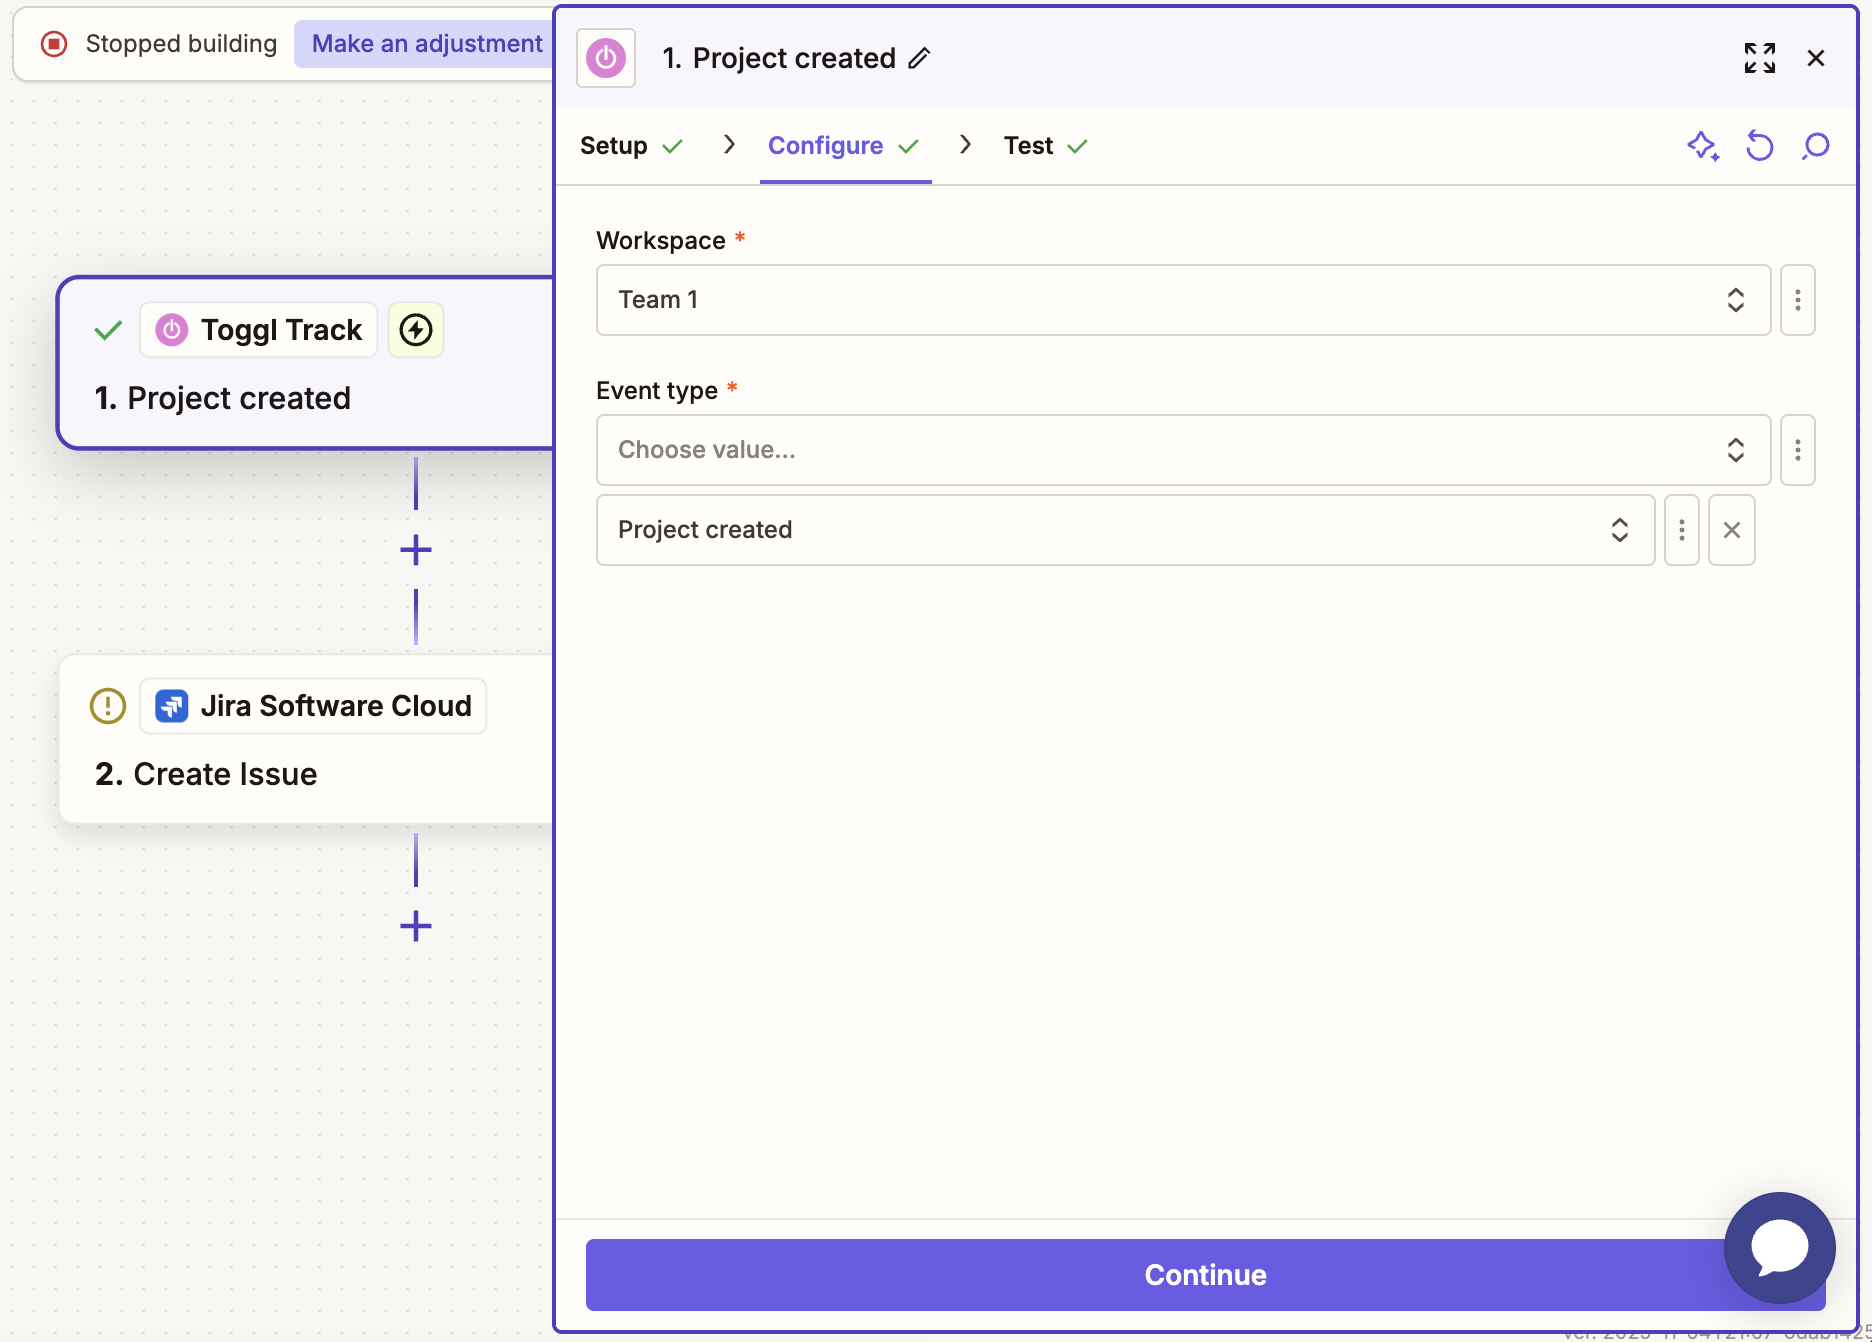
Workflow 2: Issue management in Jira
Goal: Automatically create issues in Jira when a project is created in Toggl
Zap Setup:
- Trigger: Toggl Track - New Activity (Any Type)
- Event Type: "Project created"
- Workspace: Your workspace
- Action: Jira - Create Issue
- Project: [Project name from trigger]
- Issue Type: [Selected Issue Type]
Result: A new issue is created in Jira whenever a project is added in Toggl
Limitations
- API Rate Limits: Toggl has rate limits on API requests (typically not an issue with Zapier). You can read more about it here.
- Historical Data: Triggers only work on new data created after the Zap is turned on
- Polling Frequency: Non-webhook triggers check every 5-15 minutes depending on your Zapier plan
- Multi-step Zaps: Complex workflows may require a paid Zapier plan
Updated on: 06/16/2026
Thank you!