The Timesheet view gives you a structured, grid-style way to log and review your time across the week. Instead of interacting with individual time entries on a calendar, you can see all your tasks laid out in rows with day columns — making it easy to fill in hours quickly and get a clear picture of where your time went.
Navigating the Timesheet view
To access the Timesheet view, open the Calendar tab and select Timesheet from the view options at the top.
You can navigate across different time ranges using the controls at the top of the view:
- Single day: Shows one specific day
- 3 days: Shows the current day plus the next two
- 5 days: Shows a standard work week (Mon–Fri)
- Week: Shows the full 7-day week
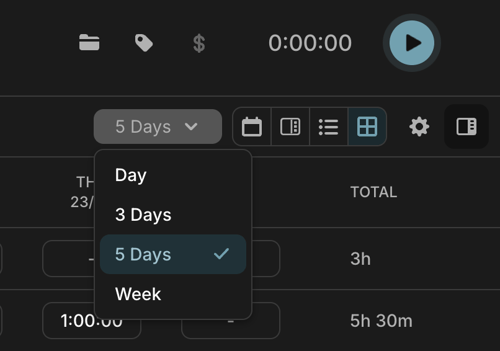
The date range shown updates automatically as you switch between these options. You can also use the navigation arrows to move forward or backward in time.
Showing tasks in the sidebar
The Display sidebar toggle available in the Calendar view is intentionally disabled in the Timesheet view. Because the task sidebar takes up a significant portion of the screen, keeping it hidden ensures the time grid remains readable and usable.
Logging time
Adding time to an existing task
To log time against a task that already appears as a row in your Timesheet:
- Click on the cell for the day you want to log time for.
- Type a value. You can use hours (e.g.
1h,1.5h,2.5h) or minutes (e.g.60,90).
Input format reference:
| Input | Interpreted as |
|---|---|
1 h |
1 hour |
0.5 h |
30 minutes |
60 m |
60 minutes (1 hour) |
90 m |
90 minutes (1.5 hours) |
0.5 (without unit) |
0.5 minutes (30 seconds) |
When you add time to a cell that already has a time entry logged, the duration of the existing entry is extended. A new entry is not created.
Creating a new task from the Timesheet
If a task doesn't yet exist, you can create one directly from the Timesheet view:
- Click the + Add task button (or equivalent) at the bottom of the task list.
- Type your task name and select or create the task.
- Enter a duration in the relevant day cell.
When a task is created this way, its time entry is automatically set to start at 8:00 AM. This is intentional.
Expanding rows to see and edit details
Each row in your Timesheet has a chevron on the left. Click it to expand the row and see the individual time entries that make it up.
Within an expanded row you can:
- Add a description to any entry
- Change its duration
- Toggle its billable status
- Add additional entries under the same task
This is useful when you've worked on the same task multiple times in a day and want to break down what each block was for, without leaving the Timesheet.
Permanent vs. temporary rows
Rows you've added but not yet saved appear in blue. Saved rows appear in black. This makes it easy to see at a glance which changes are committed and which are still in progress.
Temporary rows disappear if you refresh the page or navigate away — you don't need to delete them manually.
Saving your changes
How saving works depends on whether you're editing a new row or an existing one.
- New (blue) rows: Changes aren't saved automatically. Fill in the task, project, description, duration, and billable status in any order, then click Save to commit them.
- Existing (black) rows: Changes save automatically as you make them. There's no Save button — just edit the field and your update is applied.
This is intentional. New rows often need several fields filled in before they make sense, so we wait for you to confirm. Existing rows are already complete, so edits commit straight away.
How time logs are managed
Multiple entries for the same task on the same day
If a task has more than one time entry on a given day (for example, you worked on it in the morning and again in the afternoon), they will both appear as a combined total in that cell.
If you have made changes more than one once to a single Task via the Timesheet within a single day (e.g. on Tuesday the 14 April), the changes will appear as a single time log rather than multiple new time logs created.
If you reduce the total time shown in that cell, Toggl will reduce the most recent entry first, down to zero, before adjusting earlier entries. This gives you predictable, consistent behaviour when editing.
Note: If you create time logs via the Calendar Tab or List view, those entries will follow the respective timings that they were created at.
Taskless entries
You can log time against a project without assigning a task. These entries appear in the Timesheet with just the project name and no task. Useful for ad-hoc work that doesn't fit an existing task.
Empty rows
If you add a task row but don't log any time against it, that row is considered a temporary state. If you refresh the page or navigate away, the empty row will disappear. The task itself is not deleted. it simply won't remain permanent until it has a time log associated with it.
Deleting a row
To remove a task row from the Timesheet, hover over the row and on the far right click on the ‘x’ and select ‘Delete’ when prompted. Confirming will delete all time logs for that task within the current view. This action cannot be undone.
Billable status and tags (Updated)
Billable can be set at two levels:
- Per row: Toggle billable for an individual entry inside an expanded row. Each entry under the same task can be billable or non-billable independently.
- When adding a new entry: Set billable status as you create the entry, before saving.
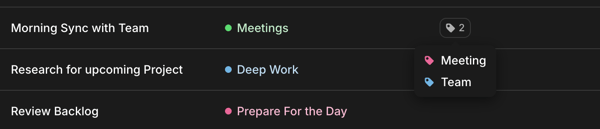
If a task has multiple tags, only a summary is shown by default. Hover over the tag indicator to see all associated tags.
Copying time from a previous week
At the top of the Timesheet view, you'll find two options for pre-filling the current week based on the previous week's data.

Prefill projects and tasks
This prefills the task rows from last week into the current week, leaving all time cells empty. Use this when your tasks are similar week-to-week but the hours vary. You can then fill in the time yourself.
Any rows you leave empty will still disappear on refresh. Simply fill them in for them to remain OR just click on Prefill projects and entries again.
Copy projects and entries
This copies both the task rows and the logged hours from last week into the current week. If you've already entered some time for the current week, the copied data will be added on top of what's already there.
Use this when your time allocation is consistent week-to-week and you want a fully pre-filled starting point.
Sync with other views
Any changes you make in the Timesheet view are reflected in real time across the List view and the Calendar view, and vice versa. You don't need to refresh or switch views to see updates. Everything stays in sync automatically.
Frequently asked questions
Why did my row appear in blue?
Blue rows are temporary. They haven't been saved yet. Click Save to commit them. If you refresh before saving, they'll disappear.
Why did my task row disappear after I refreshed?
If no time has been logged against a row, it's treated as temporary and won't persist after a page refresh or navigation. The task itself still exists. Re-add it to the Timesheet and log some time to keep it visible.
Why does a new time entry always start at 8:00 AM?
When you create a time entry from the Timesheet view (rather than from the Calendar), there's no specific start time associated with it. Toggl defaults to 8:00 AM so the entry appears at the top of your day when you open the Calendar view, rather than being hidden at an unexpected hour.
What happens if I reduce time on a task that has two entries in the same day?
Toggl Focus will reduce the most recently created entry first. Once that entry reaches zero, it will be removed, and any further reduction will apply to the earlier entry.
Can I change the task or project on an existing entry?
Not yet. You can edit the description, duration, and billable status of an existing entry, but task and project can't be changed inline at the moment. This is on the way — for now, delete the entry and create a new one if you need to reassign it.